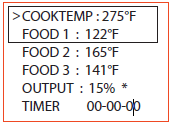
MAIN SCREEN
When the main screen is displayed, using the UP and DOWN keys will scroll the display up and down through the list of options. Two lines are displayed, and are scrolled through one line at a time. If scrolling is turned on, the main screen items are indexed through automatically. An arrow appears on the display next to the parameter that can be modified. The only main screen parameter that cannot be changed in the example below is “OUTPUT: 15 % *” since this is just reporting the fan’s output percentage.
To change a value, scroll to the value you wish to modify using the UP/DOWN keys. The line will be denoted with an arrow. Select the value using the M/E key. Navigate to the value you wish to modify using the LEFT/RIGHT keys. Modify the value using the UP/DOWN keys, then press the M/E key to save. The labels COOKTEMP, FOOD1, FOOD2, FOOD3 may be changed via the web interface, but will always remain the same on the controller.
If a food or cook sensor is unplugged or damaged (open), it will show OPEN next to the corresponding item.
COOK TEMP
Scroll to COOKTEMP (pit temp) in the MAIN SCREEN using the UP/DOWN keys (arrow will display) to modify its value. Press the M/E key to modify the cook setpoint as follows:

Use the LEFT and RIGHT keys to select the digit to be modified. Adjust the values using the UP and DOWN Keys. Then press the M/E key to enter and store the value and return to the main screen.
The adjustment range of the COOK SET is 32–475° F or 0-246° C. The default value for the COOK SET is 275° F.
FOOD TEMP
Scroll to FOOD X (1, 2 or 3) in the MAIN SCREEN using the UP/DOWN keys (arrow will display) to modify its value. Press the M/E key to modify the setpoint of all 3 food probes individually as follows:

Use the LEFT and RIGHT keys to select the digit to be modified. Adjust the values using the UP and DOWN Keys. Press the M/E key to enter and store the value and return to the main screen.
The adjustment range is 32–475° F or 0-246° C. The default value is 180° F.
When the food temperature exceeds the setpoint, the FOOD DONE message blinks with the temperature and the beeper sounds. Please note that if you set the setpoint below the food’s actual temperature, the DONE alarm will sound (press any key to clear alarm).
OUTPUT %
The output percent is not changeable by the user but is simply a display of the output percentage of the control. The “*” character is shown next to the output % value when the output is energized.
TIP: During your cook if you notice the output percentage hovering around 80-100% for a long time, you may be running out of charcoal. If you notice the output % hanging around 10% for a long time and the temperature is oscillating you may want to close the blower damper adjustment slightly for better control.
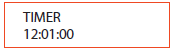
TIMER
Scroll the TIMER in the MAIN SCREEN using the UP/DOWN keys (arrow will display) to modify its value. Press the M/E key:
Use the LEFT and RIGHT keys to select the digit to be changed. Adjust the values using the UP and DOWN Keys, press the M/E key to enter and store the value and return to the main screen. .
Once you enter a value, the control will begin counting down. The maximum value is 99:59:59. When the countdown finished, the action specified in TIMEOUT will be taken.
SYSTEM SETUP SCREEN
To access the SYSTEM SETUP from the MAIN SCREEN display, press and hold the UP and DOWN keys together for 3 seconds.
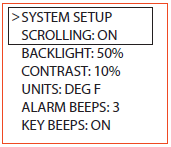
Just as with the main screen, pressing the UP or DOWN Keys will scroll up and down through the list of shown parameters as follows:
- When SYSTEM SETUP is in the top line (with arrow) pressing the LEFT or RIGHT key will index to the Control or Wi-Fi setup screens.
- Scroll through the values using the UP/DOWN keys. To modify a value, press the M/E key. Use the LEFT/RIGHT keys to select the digit to be modified, then adjust the value with the UP/DOWN keys. Press the M/E key to save. To return to the MAIN SCREEN press the UP and DOWN keys together.
SCROLLING
You may select whether or not the MAIN SCREEN automatically scrolls. The default value is OFF. Set using the UP/DOWN keys as described above.
BACKLIGHT
The display backlight is adjustable from 0-100%. Select the digit using the LEFT and RIGHT keys and adjust the value using the UP/DOWN keys.
CONTRAST
The display contrast is adjustable from 0-100%. Select the digit using the LEFT and RIGHT keys and adjust the value using the UP/DOWN keys. Note that varying just a small amount will make the display unreadable; we suggest leaving it at the default value of 10%.
UNITS
You may select whether to use Deg F or Deg C. Default is Deg F. Select the digit using the LEFT and RIGHT keys and adjust the value using the UP/DOWN keys.
ALARM BEEPS
You may select from OFF, 1, 2, 3, 4 and 5. Select the digit using the LEFT and RIGHT keys and adjust the value using the UP/DOWN keys.
KEY BEEPS
Whenever a key is pressed, a short chirp occurs as feedback for a key press. The default value is ON. Select the digit using the LEFT and RIGHT keys and adjust the value using the UP/DOWN keys.
CONTROL SYSTEM SETUP
To access the CONTROL SETUP from the MAIN SCREEN display, press and hold the UP and DOWN keys together for 3 seconds, then press the LEFT KEY. To return to the MAIN SREEN press the UP and DOWN keys together.
Once in CONTROL SETUP, pressing the UP or DOWN keys singly will index up and down through the list of shown parameters as follows:

Scroll through values in the CONTROL SETUP SCREEN using the UP/DOWN keys. To modify a value, press the M/E key. Use the LEFT/RIGHT keys select the digit to be modified. Adjust the value with the UP/DOWN Keys. Press the M/E key to save. To return to the MAIN SCREEN, press the UP and DOWN keys together.
When CONTROL SETUP is in the top line (with arrow), pressing the LEFT or RIGHT key will index to the other setup screens.
COOK HOLD
COOK HOLD defines the temperature that the cook setpoint will be reset to when the TIMER expires, if TIMEOUT action is set to HOLD. The default is 200° F. Set using the UP/DOWN keys.
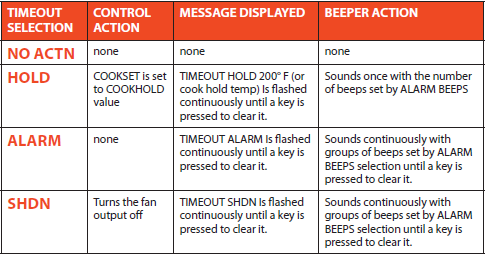
TIMEOUT
TIMEOUT defines the action that will be taken when the timer counts to 00:00:00. The selections are NO ACTN, HOLD, ALARM, SHDN. The default is NO ACTION. Set using the UP/DOWN keys.
ALARM DEVIATION SETPOINT
If the temperature of the pit deviates above the setpoint by the alarm deviation setpoint, the alarm will sound and the display will blink COOK TEMP HIGH and the temperature value.
If the temperature of the pit deviates below the setpoint by the alarm deviation setpoint, the alarm will sound and the display will blink COOK TEMP LOW and the temperature value.
The alarm is only allowed once the temperature gets near the cook temperature setpoint. The alarm deviation is settable from 10-100° F and the factory default is 50° F.

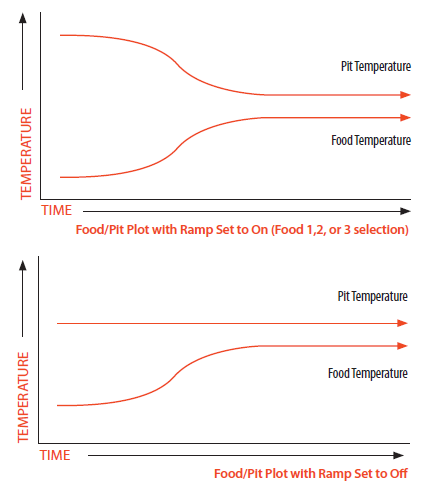
RAMP (COOK AND HOLD)
When the ramp is set to on, the low and slow ramp mode is enabled. The ramp selection tells the control which sensor to ramp from, so the selections are off, Food1, Food2, Food3. This mode is used for slow cooks so your food (meat) never over-cooks. This feature will gradually lower the pit temperature to the food X set point temperature when the food is within approximately 30° of being done. The controller will hold the pit temperature slightly above your food set point as long as there is fuel. This feature is similar to cook and hold, but the control calculates everything for you. The factory default setting is off, so you must enable this feature to use it. Note when using this feature, you may want to start your pit temperature a little higher than normal to reduce cook time and not overcook your food.
OPEN LID DETECT
This feature will allow recovery to the cooking temperature without overshoot after you open the cooker’s lid. When open lid detect is set to off and you open your pit’s lid, the temperature will drop. The inrush of oxygen can cause the blower to over-fire the coals and cause overshoot when the lid is shut again. When open lid detect mode is on, it detects when the pit’s lid has been opened and minimizes the blower running during that time. Some overshoot will always be present when your pit’s lid is opened and closed even if the blower is off, because it still introduces oxygen to the fire. The factory default is ON, so you must turn this OFF if you have problems with excess air currents in your pit.
When open lid detect is enabled during startup, the rate of temperature rise of your pit will be limited to preventing over-firing. This will make a typical startup to a temperature of 250° F take a minimum of about 20-30 minutes and will also help to eliminate startup overshoot.
WI-FI SETUP SCREEN
To access the Wi-Fi Setup Screen from the MAIN SCREEN display, press and hold the UP and DOWN keys together for 3 seconds. Navigate to the Wi-Fi SCREEN using the LEFT/RIGHT arrows. To return to the MAIN SCREEN, press the UP and DOWN keys together.
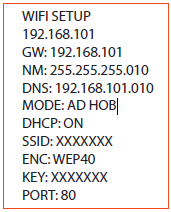
For ease of use, we suggest setting up your Wi-Fi link by following the instructions in section 9. The interface is much easier to use, and it can be done from any PC or mobile device equipped with a web browser.
*** It is important to remember to cycle power (turn unit off and then on again) after changing the Wi-Fi settings. They will not be used until power is cycled. If changing parameters from a hot-spot or Wi-Fi connection, you can use the reboot button at the bottom of the web page.
Just as with the main screen, pressing the UP or DOWN Keys will index up and down through the list of shown parameters as follows:
When WI-FI SETUP is in the top line (with arrow) pressing the LEFT or RIGHT key will index to the next or previous setup screens (see menu diagram).
Scroll through values in the Wi-Fi SCREEN using the UP/DOWN keys. To modify a value, press the M/E key. Use the LEFT/RIGHT keys to select the digit to be modified. Adjust the value with the UP/DOWN Keys. Press the M/E key to save. To return to the MAIN SREEN, press the UP and DOWN keys together.
Was this article helpful?
That’s Great!
Thank you for your feedback
Sorry! We couldn't be helpful
Thank you for your feedback
Feedback sent
We appreciate your effort and will try to fix the article